Content Modeling Step-by-Step Guide
Content modeling, how is it done? It's not as tricky as it sounds! It usually starts with some good old-fashioned brainstorming and planning, often in team workshops.

Content modeling establishes the structure for all product information and marketing materials used in the promotion and sale of your offerings.
However, there isn't a single, universally ideal content model.
A well-crafted content model necessitates a thorough grasp of the business, data flow, editorial processes, frontend technologies, and the foundational principle of a single source of truth.
It also, frankly, requires a healthy dose of pragmatism.
This article is the second one in the content modeling series here at Crystallize:
Content Modeling Explained > Content Modeling Step-by-Step Guide (with Examples) > Content Modeling Tools and Organization
I urge you to read all three articles. By the end, you’ll understand how content modeling turns content chaos into a well-organized library — saving time, improving quality, and setting the stage for scalable, future-friendly content. 🚀
Different Approaches to Content Modeling
Content modeling is not an exact science. It is a craft learned by experience, trial, and error. There are two main approaches: channel content modeling and semantic content modeling. And, of course, the real-world examples where you have a hybrid of the two.
Channel or Page Oriented Content Modeling
When doing content modeling for a specific channel or to power particular types of web pages, you model more directly to the elements on the screen. Instead of thinking about reuse, you design for display and, perhaps, also consider some flexibility in how the display should be adjusted.
Content modeling for a specific channel offers the benefit of providing more control over the content's presentation for that channel (perhaps at the cost of content re-use and the principle of separating content and presentation).
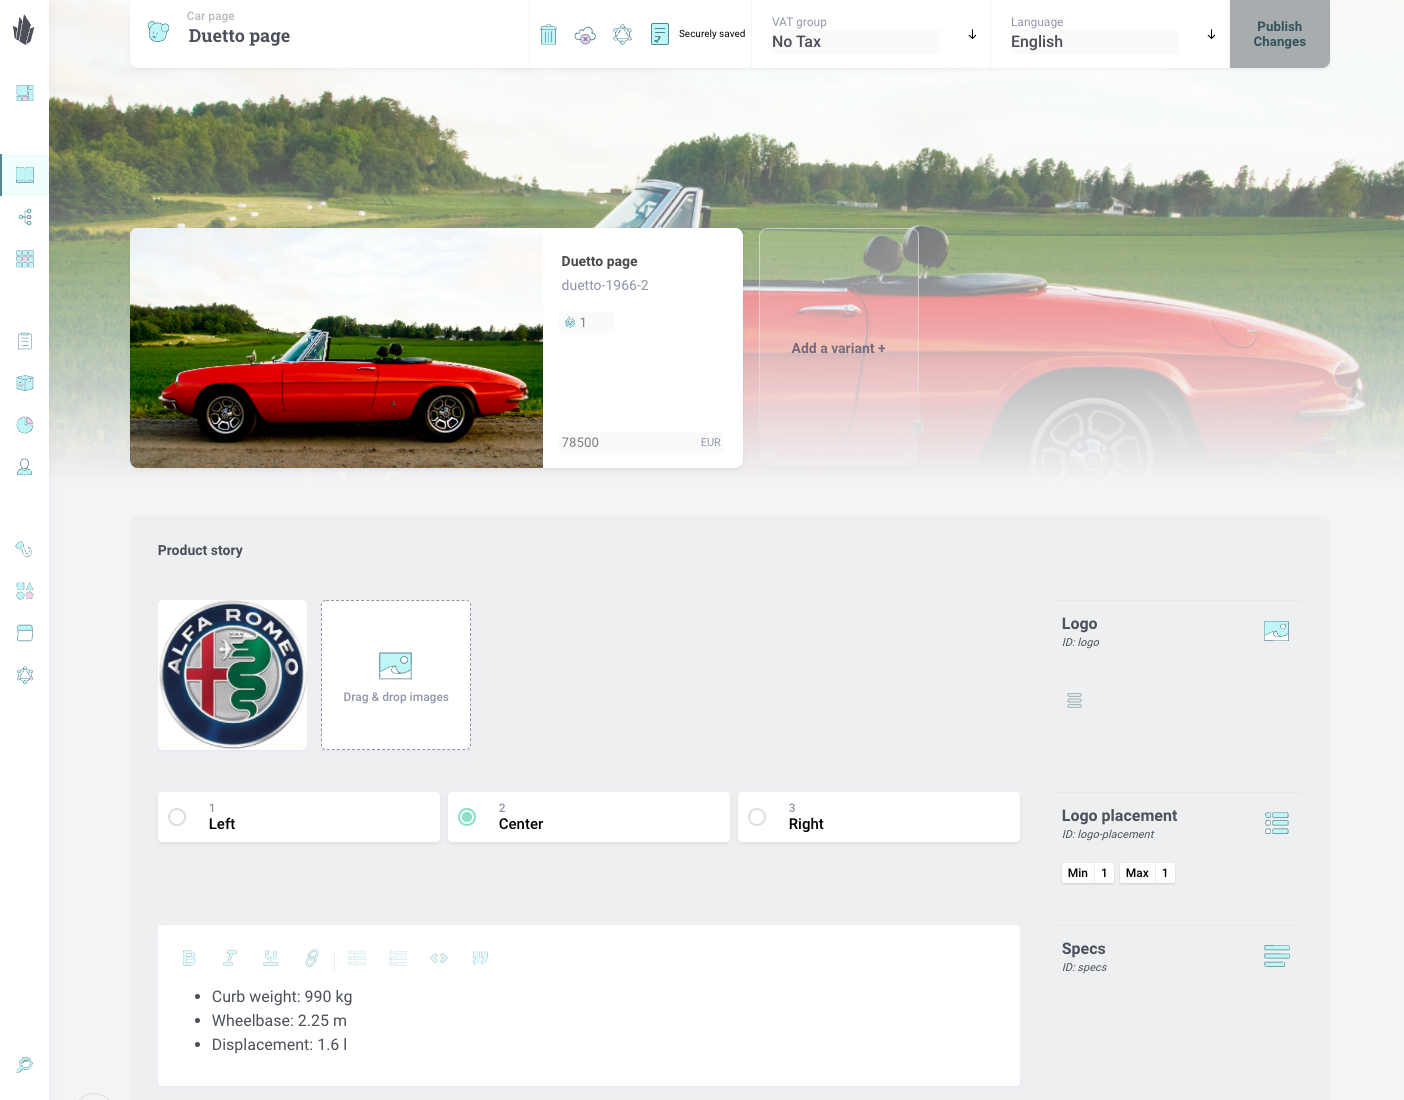
Consider the simplified content model below for a car. We may have the following:
- The core product information includes details such as product name, SKU, stock, price, etc.
- Images and videos.
- Maker/brand logo.
- Selection with different display options for the logo (left, center, right).
- Rich text component specifying the specs: curb weight, wheelbase, and displacement.
You can easily create a visually appealing product page for this car that provides the information most buyers are looking for.

Semantic Content Modeling
When performing semantic content modeling, you aim to describe product information in as much detail as possible and provide as much context and information as necessary. There is no information on how this will be presented on any channel.
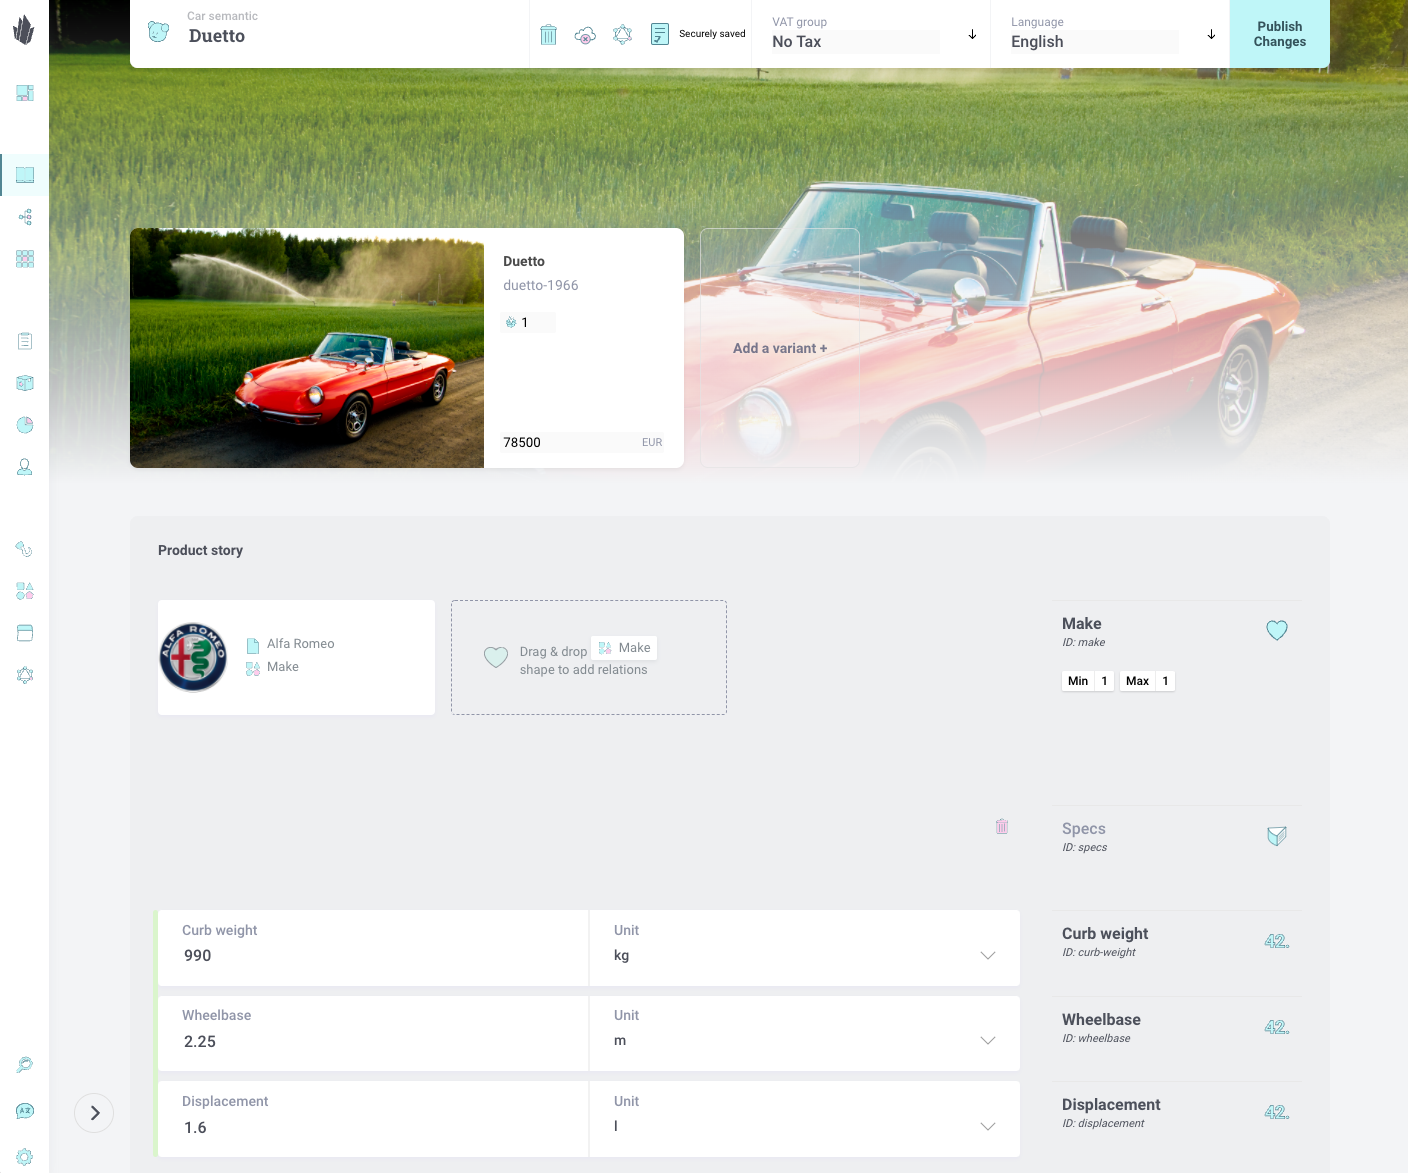
Take a look at the screenshot below in comparison:
- Core product information is defined the same.
- Maker/brand is defined as a relationship to a Make item, enabling the reuse of make information across multiple cars. Additionally, you can easily find all cars of the same make or brand.
- There is no information on how to display the maker/brand for any channel.
- Specs are defined as numeric values accompanied by a specific unit. We can easily obtain the values to present on a given channel. Additionally, we can use this to compare, for example, curb weight between multiple cars, i.e., search for cars that have a given curb weight or less.
With the semantic content modeling approach, you are free to use the product information as needed now and in the future. It is more structured and opens up more possibilities for future reuse.

Content Modeling Process (Step-by-Step)
So, there are two ways to go about content modeling, and often, you'll see a mix of both approaches. But where and how do you start? We’re so glad you asked.
Here is a general step-by-step guide, which pulls together the best advice from content architecture pros.
1. Discover and inventory your content. The first step is to take stock of all the content your business currently has (and plans to have) across all channels. This is essentially a content audit or inventory. Gather examples of everything: product pages, blog posts, landing pages, videos, PDFs, user-generated content – whatever content you produce or manage. Don’t forget content used in different contexts: your website, mobile app, email newsletters, social media, and even third-party syndication. The goal is to compile a comprehensive list of content types that all your stakeholders are involved with.
2. Identify and group content types. Next, from that inventory, group similar kinds of content and define your content types. For example, you might identify content types like Product, Blog Post, Event, Testimonial, Recipe, etc. Items that have a similar purpose or structure belong to the same content type. It’s okay if some content types are only used on certain channels – include them if they’re distinct. You may find you have multiple varieties of a basic type; for instance, an “Article” vs a “Press Release” might have slightly different fields, so you can decide if they’re one type or two. The point is to categorize content into a manageable set of types. You should also think about whether some content types will be used as components or sub-parts of others (for example, you might have an “Author” content type that is referenced by the Article).
💡Pro tip: Don’t go overboard with ultra-specific types – start with broader categories and you can refine later. But also, don’t force wildly different content into one type. The mantra here is “separate what’s different, and unify what’s the same.”

3. Identify repeating elements (fields). Once you have your content types, look within each type to list the pieces of information (fields or components in Crystallize) it needs. Essentially, you’re defining the schema for each content type. A good way to do this is to examine real examples: take a sample product page and note all the bits of info on it (Name, Price, Description, SKU, Image, etc.). Those become your fields for the Product type. Do this for each type. Pay attention to information that repeats across multiple items, as that often becomes separate content pieces or taxonomies. For instance, if every blog post and press release has an author name and bio, you might abstract “Author” into its own content type rather than a simple text field (so you manage authors in one place). Likewise, if many types have a category or tag, that suggests a taxonomy.
💡Pro tip: Anything that appears in many places should probably be a field of its own or a linked content item.
4. Define relationships between content types. With content types and fields in hand, consider how the types relate to each other. Content relationships are a key part of modeling, as they allow you to link content pieces together in meaningful ways. A Product content type might have a relation to other Products (for “Related Products”), or to a Category (to classify it), or to an Author (for content pieces), etc. For instance, an Article references an Author entry; a Recipe might reference Ingredient entries. Relationships can be one-to-one or one-to-many. Identifying relationships often goes hand-in-hand with the previous step – when you pulled out repeating info as separate types, you created a relationship (e.g., Article -> Author).
💡Pro tip: Relationships help content “network” together. They are also used along with hierarchy or taxonomy to build navigation and enable dynamic linking (like “All recipes by this chef” or “Products compatible with this item”).
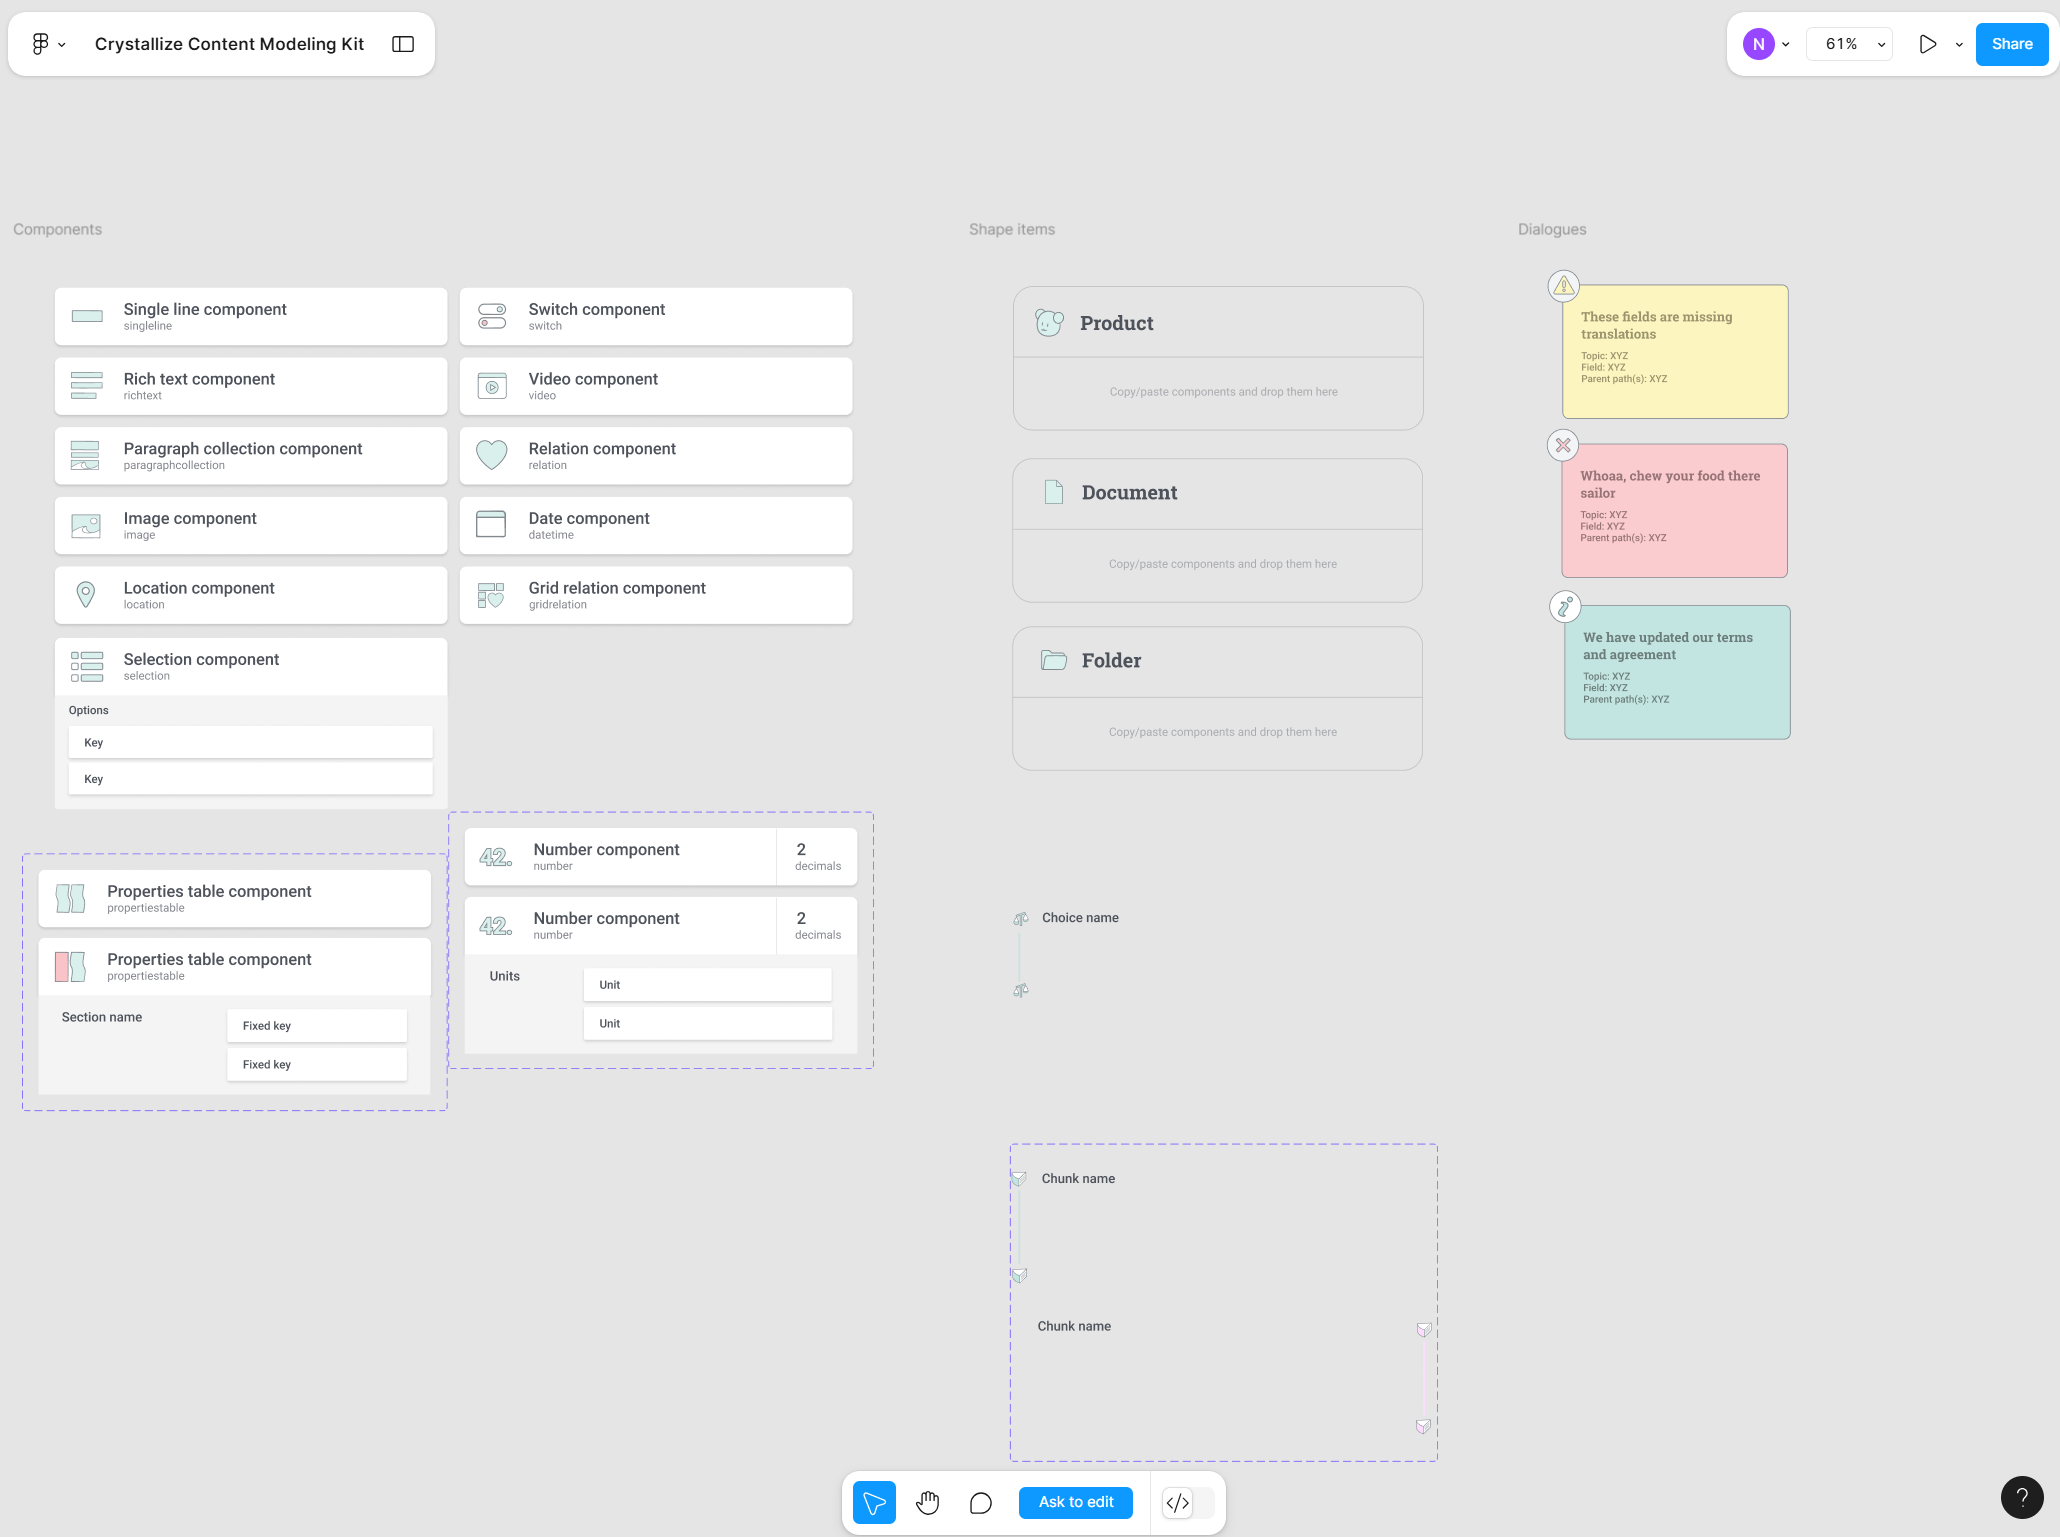
5. Document your content model. As you work through the above steps, it’s helpful to create a visual or spreadsheet representation of the model. Many teams use simple spreadsheets to list content types (as columns or tabs) and their fields (as rows), with notes on relationships. Others prefer visual diagrams (UML class diagrams, mind maps, or tools like Figma – see the Content Modeling Tools article) to represent content types as boxes and relationships as lines. Documenting the model serves two purposes: (a) it acts as a blueprint for implementing the model in a PIM, commerce platform, CMS, or database, and (b) it becomes a living reference for your team to understand how content is structured. Ensure that you include details such as which fields are optional/required, any necessary formatting or data types (e.g., integer, date, rich text), and guidelines for content creators on how to populate them.
6. Bridge patterns; when to use them? By the time you’ve mapped your content types, defined your shapes, and laid out your relationships, you’ve solved the basics. But as soon as the real catalog hits your PIM—global variants, regional constraints, marketing taxonomies, seasonal overrides—you feel the friction. This is when bridge patterns become your best friend.
Bridge patterns give you a structured way to express complexity inside the model instead of patching it across frontend logic or adding random exceptions to shapes. They help you pre-empt data chaos by turning real-world constraints into explicit modeling rules. Below is a practical way to know which bridge to reach for and when.
Bridge Pattern | Use When | Example |
|---|---|---|
You need meaning-based grouping | Seasons, themes, topics | |
You need buckets or ranges | Sizes, age groups | |
One attribute depends on another | Color → Material, Region → Shipping | |
Variants require multi-dimensional pairing | Color + Size matrix |
You don’t need them everywhere. But as your catalog grows, they become the modeling layer that keeps your PIM clean, predictable, and future-proof.
7. Implement the model. Once you have designed the model, the next step is to set it up in the system you use to manage content (e.g., PIM, a headless or traditional CMS, a commerce platform, or a custom database). This typically involves creating the content types (sometimes referred to as “content models” or “schemas” in system interfaces) and adding the fields precisely as defined.
💡Pro tip: Keep developers in the loop here; they may need to adjust front-end templates or databases to accommodate the new structure.
8. Populate content and refine as needed. After implementation, start creating content with the new model. Often, you’ll do a trial run or pilot with a subset of content. This is where you validate that the model works in practice. You might discover, for instance, that an extra field is needed, or that an assumed content relationship wasn’t actually necessary. It’s normal to iterate a bit. Start small if possible – perhaps model one section of the site first – and get feedback from content creators using it to refine the model.
9. Govern and maintain the model. Finally, treat your content model as a piece of critical infrastructure. Assign ownership or stewardship to ensure the model remains up-to-date and that new content requests are routed through a modeling consideration process.
By following these steps, you ensure that your content model is thorough and tailored to your organization’s needs rather than an abstract diagram that doesn’t map to reality. And don’t worry – you can iterate and improve as you go.
Crafting a Structured Product Catalog in Crystallize (Brewed to Perfection Example)
☕ Brewed to Perfection is an imaginary coffee brand I made to showcase the ability of Crystallize over at Medium, and it is a perfect example of how flexible and versatile our content modeling is (among other things).
A key strength of Crystallize is what we call the Product Universe. This means you can structure your catalog and product information precisely as needed for rich storytelling, tailored to your specific use case. Let’s create a custom product shape for our coffee products and organize them in a meaningful hierarchy in a couple of steps.
1. Define a “Coffee Product” Shape: In Crystallize’s PIM, shapes define content structure. We've developed a Product Shape specifically for our coffee products. This shape serves as a template, providing customized fields for product storytelling and specifications, in addition to default fields like title and price. For example, our Coffee Blend shape includes various components to capture detailed information about each blend.
- Summary – a short description or tagline for a quick overview.
- Description – a rich text field for the main story, e.g., the origin story of the beans or the roast process.
- Flavor Notes – an enumerated list or rich text highlighting tasting notes (e.g., “Dark chocolate, citrus, nuts”).
- Brewing Tips – rich text or list for how to brew that coffee for best results.
- Images/Gallery: This is the media component for product images (e.g., bag packaging, close-ups, and maybe a brewing lifestyle shot).
- Related Products – a component to relate items (for cross-sells like mugs or brew equipment, if any).
By modeling these fields, we’ve built content-rich product pages. Crystallize's open-ended content modeling allows for the seamless integration of marketing content with product information, enabling us to "craft rich product stories." For example, a merchandising block can be embedded within a story, or a brewing tutorial article can be linked to a coffee product—all within the shape design.
2. Configure Product Variants: Our coffee blends will be sold in multiple variations – for example, by package size and grind type. We need to reflect this in Crystallize. Out of the box, every product can have variants and variant-specific data (SKU, prices, stock, etc.). We’ll define two variant attributes for coffee: Size (e.g., 250g, 500g, 1kg) and Grind (Whole Bean or Ground).
Crystallize allows you to add custom attributes to variants when creating products. Using the variant generator, we can input the possible Size and Grind values and let it create all combinations, saving time if we have many options. Each variant will have:
- a Name (could be auto-generated or left blank),
- a SKU (unique code, e.g., NDR-250G-WB for Nordic Dark Roast 250g Whole Bean),
- its Price(s) (we’ll handle multi-currency pricing shortly),
- and Stock levels for inventory.
3. Organize the Catalog Hierarchy: To ensure easy navigation, structure the catalog by creating a "Coffee Blends" folder under "Shop" in the Catalog tree for coffee products. Additional folders like "Merchandise" or "Subscriptions" can be added as needed, but the current focus is on coffee products. This hierarchical structure of folders and products forms one dimension of content organization.
Crystallize also offers Topic Maps, a taxonomy system for tagging items across various categories. This feature provides a secondary organizational method, allowing us to classify coffees by criteria such as roast level, origin country, or flavor profile. For example, we could create topics like "Origin: Ethiopia" or "Flavor: Fruity" and apply these tags to relevant products. This enables users to filter or discover products based on these tags, even if all coffees are stored in a single folder, which is highly beneficial for faceted navigation or dynamic content grouping.
Setting the shape and structure in place is just the beginning of building a catalog with actual coffee products.
☕ Brewed to Perfection.
Be sure to check the linked article, where I cover and talk about:
- Products and Variants
- Multi-Region Localization (Languages & Currencies)
- Rich Product Storytelling exemplified
- Dynamic Menus by Region and Time of Day
- Integrating Payments: Stripe and Vipps
- Real-Time Stock, Regional Pricing, and Menu Customization
And built a complete online coffee shop, from the initial boilerplate setup (or from scratch) to serving a localized, story-driven coffee catalog made possible by a headless architecture, ensuring a responsive front end and backend content perfectly brewed for eCommerce.

Content Connects Your Business With Your Customers
The content modeling process moves from analysis (what content do we have?) to design (how should we structure it?) to implementation (configure the system) to ongoing refinement. It requires both big-picture thinking (what content and experiences are we delivering) and detail-oriented thinking (what format each field should be, what’s required vs optional, etc.).
The real value in content modeling lies in the modeling process, not the model itself. Content modeling is an iterative and incremental process focused on defining the content necessary to achieve business objectives. Tools like Crystallize, designed to facilitate content modeling, accelerate this process, ensure team alignment, and ultimately deliver content precisely tailored to your business needs and user expectations.
SCHEDULE A 1-on-1 DEMO to explore how content modeling in Crystallize can help you achieve your goals. Or, why not START building for FREE.
P.S. For even more on content modeling, check out the Content Modeling Livestream playlist over at YouTube, where in five recorded streams, we go over basic concepts, types of content modeling approaches, composable content modeling, the role of product storytelling with bundles of products and product variants in mind, and model out the Tesla online car configurator using the Crystallize example.
🧩Content Modeling Series You Missed

Content Modeling with Structured Content Explained
Content modeling is the practice of defining structured content for your websites, apps, or any digital platform.

Content Modeling Tools
You can certainly sketch out content models on a whiteboard or in a notebook – and many teams start exactly that way. But it's better to use tools built for content modeling, right?
