More in Learn

Managing Subscription Plans in the Crystallize App

Subscriptions in Crystallize are highly flexible, allowing you to implement all manner of subscription models. You can use the Crystallize App to create subscription plans that can then be associated with products and customers.

A subscription plan is a blueprint that defines a common set of properties that you can apply to any product you wish to sell on a subscription basis. Subscription plans can be managed with the PIM API or the Crystallize App. To view/edit subscription plans within your tenant, you’ll first need the requisite permissions for Subscription Plans and the Tree (read, create, etc). Refer to our documentation on roles and permissions for more information.

Creating Subscription Plans

On the far-left panel of buttons, click Settings, then choose Subscription Plans. You can also bring up the command palette with [CTRL or ⌘] + K and type or select “Subscription Plans.”

From here, you can either click the plus sign button (+) in the top left or or click +Create subscription plan to start adding a new plan. Type a name for the subscription in the Subscription plan box at the top of the screen.

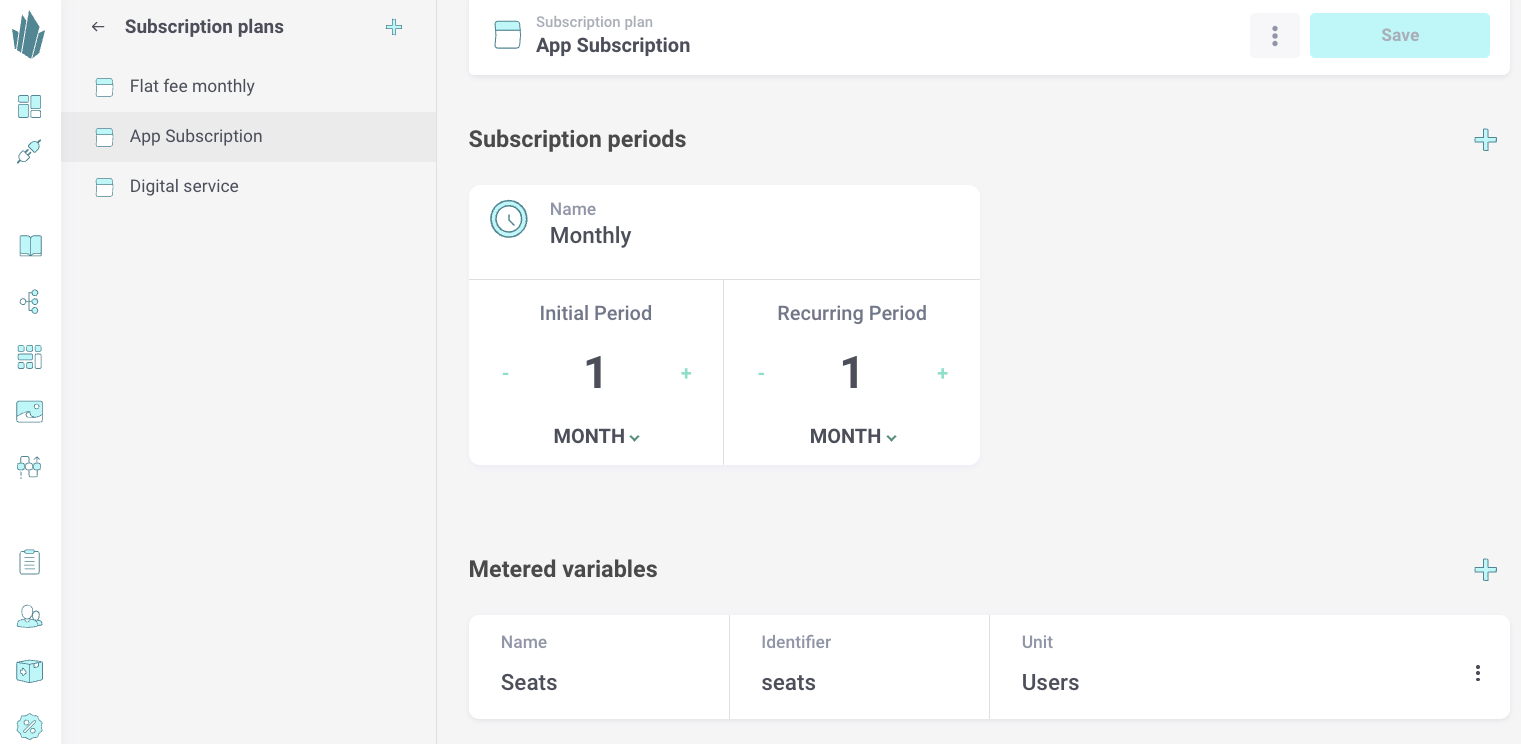
Now, you can define the following subscription plan attributes:

  • Subscription periods. Specify a Name for the subscription period. You can set an optional initial period and a required recurring period for the subscription. You’d define an initial period if, for instance, you want the first few months of your subscription to be free or discounted. Use the arrow keys or type to set numerical values, then use the drop-down menu below each box to set a unit of time. The possible values are days, weeks, months, or years.
  • Metered variables. You can optionally set up metered variables for tracking things like number of users or bandwidth usage. Click the plus sign button (+) to add a variable. Once you type in a Name and click or tab away, a unique Identifier will be auto-generated based on the name, but you can change it if you want. You’ll also need to type in a Unit of measurement, preferably lowercase and without spaces for ease of coding. You can keep adding metered variables as desired, or use the trash can button on the right to delete any you don’t want.

When finished, click the Create button.

Adding Subscription Plans to Product Variants

Once you have one or more subscription plans, they can be added to product variants within your tenant. This step enables those variants to be purchased on a subscription basis. In the App, browse through your catalogue to the product you wish to work with. From the View drop-down menu at the top of the screen, make sure Pretty is selected. Scroll to the variant you want to modify, click the action button (…) in the top-right corner of its card, then choose Edit.

Adding subscription example

Scroll down to the Subscriptions section and click the plus sign button (+). You can then choose one of your existing subscription plans from the drop-down menu.

From here, you can configure subscription pricing and (optionally) metered variables specific to this product variant.

  • Initial period. If the subscription plan has an initial period, you can use the +Add initial period button to set the price(s) for that period. (Use 0 if you intend for it to be free.)
  • Recurring period. Click into each currency box to type in the price that will be paid each period.
  • Metered variable tier type. If the subscription plan has metered variables, click on the Tier type label to choose Graduated or Volume.
  • Metered variable tiers. Click the plus sign button (+) to add tiers for pricing. Once at least 2 tiers exist, you’ll be able to adjust the values between each tier by typing into the From column on the second tier onward. Use the action button (...) on the right to remove tiers.

You can add as many subscription plans to a product variant as you like. For instance, you may want to offer monthly and yearly subscription options. Use the plus sign button (+) in the bottom-left corner of the Subscriptions section to add more plans. To remove subscription plans, click the X in the upper-right corner of the subscription window. As usual, you must click the Publish changes button at the top of the screen for these changes to be made publicly available.

Once subscription plans are added to product variants, you can create subscription contracts for customers wishing to purchase these subscriptions.

Managing Subscription Plans

To edit an existing subscription plan, browse to the Subscription Plans page, then click on the subscription plan in question to make changes. Click the Save button at the top of the screen when you’re finished. You can delete a subscription plan by clicking the action button (…) at the top of the screen and selecting Delete. Note that deleting a subscription plan will remove it from all product variants that it was attached to. Proceed carefully with deletion.

Check Out Our Subscription Plans Livestream

People showing thumbs up

Need further assistance?

Ask the Crystallize team or other enthusiasts in our slack community.

Join our slack community